
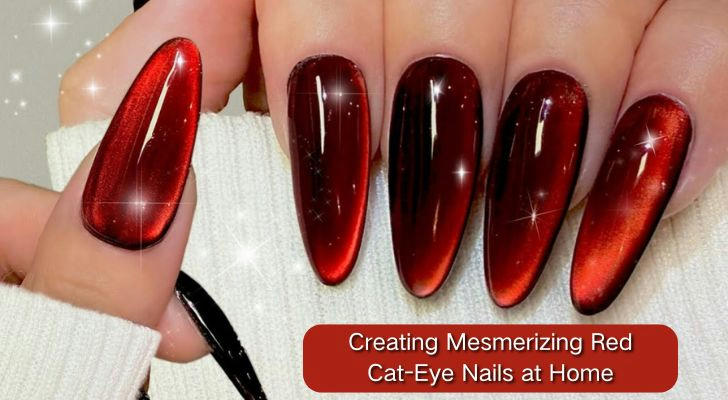
💅 Beginner's Self-Study Guide: Creating Mesmerizing Red Cat-Eye Nails at Home
The Red Cat-Eye manicure is a must-have style for the holiday season and winter. Its unique iridescent, flowing light effect can instantly elevate your fingertips' sophistication. This guide will walk you through every step of creating Red Cat-Eye nails.
🛠️ Required Tool Checklist
Before you begin, please ensure you have the following items ready:
- Nail Lamp (UV/LED Lamp): Used for curing the gel polish.
- Base Coat: Protects the nail and enhances adhesion.
- Red Cat-Eye Gel Polish: Red polish containing magnetic particles.
- Magnet: A specialized cat-eye nail art magnet, usually a strong straight bar or a double-ended magnet.
- Top Coat: Adds shine and longevity.
- Cleanser/Alcohol Wipes: To clean the nail surface and remove the tacky layer (if applicable).
- Nail Prep Tools (Buffer/File): For shaping the nail and smoothing the surface.
📝 Red Cat-Eye Nail Creation Process (7 Steps)
Here are the detailed steps for beginners to complete a Red Cat-Eye manicure at home:
Step 1: Basic Prep and Base Layer
- Clean and Shape: Use a nail file to shape your nails and a buffer to gently smooth the nail plate, removing oils and unevenness.
- Apply Base Coat: Apply a thin, even layer of the Base Coat.
- Cure: Place under the nail lamp to cure (typically 30-60 seconds).
💡 Pro Tip: The first layer does not require the magnet; its purpose is to create a base color for the cat-eye effect.
Step 2: Apply the First Layer of Cat-Eye Color
- Thin Coat: Apply a thin layer of the Red Cat-Eye Gel Polish, being careful not to get it on the skin.
- Cure: Place under the nail lamp to cure (typically 60 seconds).
Step 3: Apply the Second Layer of Cat-Eye Color (Crucial Step)
- Apply Second Coat: Apply another layer of the Red Cat-Eye Gel Polish. This layer should be slightly thicker than the first but still even.
- Do NOT Cure Yet! Keep the nail polish wet and proceed to the next step.
Step 4: Use the Magnet to Create the Cat-Eye Effect
This is the key step that determines the cat-eye look and must be done while the polish is uncured.
- Prepare the Magnet: Pick up your dedicated cat-eye magnet.
- Positioning: Place the edge of the magnet close to the nail surface (do not touch the gel), maintaining a distance of about 2-3 mm.
- Draw the Line: Hold the magnet steady for about 5-10 seconds. You will see the magnetic particles in the polish move and form a distinct line of sparkle on the nail.
- To create a vertical line, hold the magnet perpendicular to the nail.
- To create a diagonal or wavy line, try pulling the magnet from the side.
Step 5: Quickly Cure the Effect
- Cure: Once you are satisfied with the cat-eye effect, immediately place the nail under the lamp to cure (typically 60 seconds).
- ❗ Important: If you do not cure immediately, the particles may disperse, and the effect will weaken.
Step 6: Apply Top Coat
- Apply Top Coat: Apply an even layer of Top Coat, making sure to cap the free edge of the nail to prevent chipping.
- Cure: Place under the nail lamp to fully cure (typically 60-120 seconds, check your Top Coat instructions).
Step 7: Cleanse and Finish
- Cleanse Tacky Layer: If you used a Top Coat with a sticky residue, wipe the nail surface with an alcohol wipe or cleanser to remove the inhibition layer.
- Moisturize: Apply cuticle oil to the skin around your nails.
❓ Frequently Asked Questions (FAQ)
| Question | Answer |
|---|---|
| Why can't I get a clear cat-eye line? | 1. Magnet is too far: The magnet must be very close to the nail (2-3mm), but not touching the gel. 2. Gel is too thin: The second layer of cat-eye polish needs enough volume for the magnetic particles to move. 3. Weak magnet: Ensure you are using a dedicated, strong cat-eye magnet. |
| Why did the cat-eye line fade after I finished pulling it? | This is due to a lack of immediate curing. Once the effect is created, you must place the nail under the lamp right away, otherwise, gravity will cause the particles to settle back down. |
| Can I just apply one layer of cat-eye polish? | It is not recommended. The first layer (usually not magnetized) helps to enhance the color saturation and three-dimensionality of the second layer's magnetic line, making the light appear more focused. |
| Which magnet shape works best? | The most common is the straight bar magnet for classic lines. Double-ended magnets (one round, one straight) or pattern magnets can create more diverse effects, like circles or waves. |
| Can I use regular red nail polish instead? | No. Cat-Eye Gel Polish contains special tiny magnetic powder. Regular polish does not have this component and cannot create the light effect with a magnet. |
🎨 Congratulations! It's Time to Level Up Your Nail Skills!
You have successfully mastered this advanced and popular Red Cat-Eye manicure. Ready to challenge yourself with more trending nail art styles?
Our website features hundreds of step-by-step nail tutorials that can easily turn you into your own nail artist:
- ✨ Advanced Learning: Learn how to create the sophisticated and versatile Pearly Chrome Nails!
- 🎀 Holiday Special: Master the techniques for painting Winter Plaid and Cute Bows!
- 💡 Skill Enhancement: Discover how to properly use tips and extension gel to say goodbye to broken nails!
👉 [Click the link below to see more nail art self-study tutorials!]
👉 How to Avoid Bubbles and Smudges When Polishing >>>