
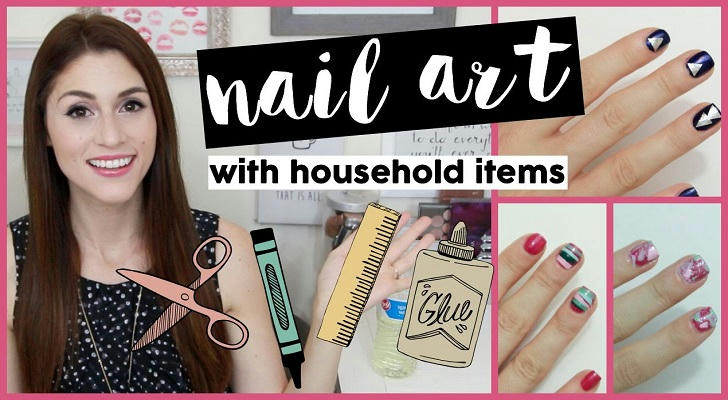
DIY Nail Art with Household Tools
DIY nail art using household tools transforms everyday items into manicure essentials for creative, salon-inspired designs without specialized equipment. Common implements such as bobby pins, toothpicks, tape, sponges, cotton swabs, and paper towels serve as dotting tools, striping guides, gradient applicators, and makeshift stamps. Techniques covered include dotting, striping, sponging, water marbling, and texturing, each followed by sealing and basic nail care to ensure longevity and nail health.
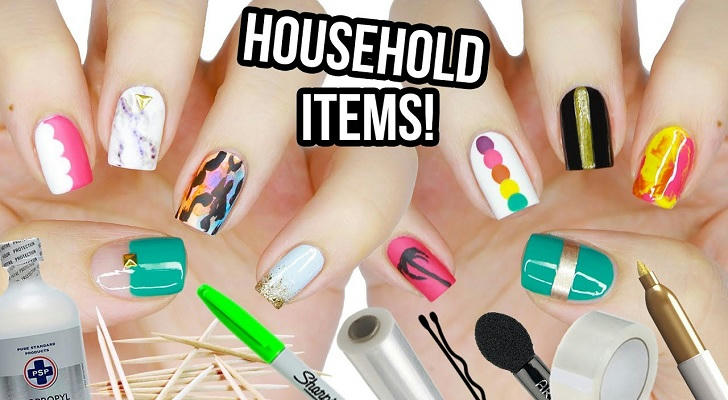
1. Essential Household Tools
- Bobby Pins or Paper Clips can be pried apart and used as dotting tools or fine-line brushes.
- Toothpicks or Wooden Cuticle Sticks provide precision for marbling effects and detailed line work.
- Clear or Painter’s Tape acts as a guide for sharp stripes and geometric patterns.
- Makeup or Kitchen Sponges enable smooth color-blend gradients and ombré effects.
- Cotton Swabs (Q-tips) clean up edges and remove excess polish.
- Paper Towels or Coffee Filters serve as disposable palettes or blotters to lift off excess polish.
- A Small Cup of Room-Temperature Water makes water-marbling possible without professional kits.
2. Simple Dotting and Detailing
2.1 Dotting with Bobby Pins
A bobby pin’s rounded end creates uniform dots by dipping into polish and applying gentle pressure; for larger dots, the flattened side can be used.
2.2 Precision Lines with Tape
After base and color coats, thin strips of tape are placed where stripes or shapes are desired; polish is applied over the tape and removed immediately for crisp edges.
2.3 Freehand Detailing with Toothpicks
For water marbling, drops of polish are added sequentially to water and swirled with a toothpick, then the nail is dipped to transfer the pattern. Toothpicks also work for drawing fine curves and waves on wet polish.

3. Gradient and Ombré Techniques
3.1 Sponge Application
A small wedge of makeup sponge holds two or more colors side by side; dabbing the sponge onto the nail blends the shades seamlessly.
3.2 Paper Towel or Coffee Filter Variations
Torn pieces of paper towel or coffee filter produce a softer diffusion when lightly dabbed on wet polish, ideal for pastel or metallic ombrés.
4. Stamping and Textures
4.1 Bubble Wrap Imprint
Bubble wrap pressed into contrasting polish and then onto a base-coated nail creates a unique dotted texture.
4.2 Aluminum Foil as Stencil
Holes punched in foil serve as mini-stencils; polishing over the foil and removing it reveals crisp, stencil-like designs.
5. Embellishments with Household Items
5.1 Rhinestone Placement
Small pieces of clear tape pick up rhinestones or beads; pressing them onto wet polish and sealing with top coat secures the embellishments.
5.2 Glitter Application
Fingertips dipped in fine glitter can accent nails—tap glitter onto wet polish, shake off excess, then finish with a sealant top coat.
6. Step-by-Step Sample Design: Polka-Dot Gradient
- Base Coat: Apply two thin coats of light pastel polish; allow full drying.
- Gradient Layer: Use a makeup sponge to dab a second pastel or metallic shade at the tip until blended.
- Dotting: Create evenly spaced dots with a bobby-pin tool in a contrasting color.
- Cleanup: Remove surrounding polish with a Q-tip dipped in remover.
- Top Coat: Seal the design with two thin layers of glossy top coat, allowing each to dry fully.
7. Sealing and Maintenance
Two thin applications of a durable top coat—one immediately after design and another after a few minutes—protect against chips and extend wear. For gel finishes, adhere to specified LED/UV curing times. Regular cuticle-oil application maintains surrounding skin health and keeps edges neat.
8. Nail Care After Art
Allow nails to rest between art sessions; buff gently with a fine-grit buffer (240 grit) to preserve smoothness and trim to moderate length to prevent breakage. Weekly use of a vitamin-rich hand cream supports keratin strength and overall nail resilience.