
How to Avoid Bubbles and Smudges When Polishing
Achieving a flawless manicure requires attention to preparation, polish handling, application technique, and drying strategies. Proper workspace setup and nail cleansing establish a clean base for polish to adhere without trapping debris or moisture, which can cause bubbles or smudges. Rolling the polish bottle instead of shaking prevents introduction of air that leads to bubbles. Applying thin, even layers in a single, steady stroke and allowing adequate drying time between coats minimizes uneven buildup and surface imperfections. Post-application measures—such as icing nails briefly or using a quality top coat—accelerate curing and lock in the design, while gentle troubleshooting techniques can eliminate any remaining bubbles or smudges before they set.
1. Preparation and Workspace Setup
A well-lit, flat workspace reduces the risk of accidental bumps that can smudge wet polish.
Removing any residual oils or old polish with a lint-free pad soaked in isopropyl alcohol ensures a fully clean surface for application.
Maintaining a moderate room temperature (around 65–75°F) and low humidity helps polish dry evenly, since heat and moisture can cause bubbling.
2. Choosing and Handling the Polish
Storing polish in a cool, dry place away from direct sunlight prevents heat-induced moisture that contributes to bubbles.
Rolling the bottle gently between palms mixes pigments without trapping air, unlike vigorous shaking, which introduces bubbles into the formula.
Inspecting polish for clumps or separation before use and discarding excessively thick or old bottles ensures a smooth consistency and reduces the risk of uneven application.
3. Application Technique
3.1 Thin, Even Layers
Using thin coats allows each layer to dry sufficiently and prevents thick pools of polish that are prone to bubbling and smudging.
Starting with a small amount of polish on the brush, applying one smooth stroke down the center followed by strokes along each side maintains uniform coverage without overworking the nail.
3.2 Adequate Drying Time
Waiting two to three minutes between coats gives solvents time to evaporate, reducing the chance of lifting or indentations when adding subsequent layers.
Allowing the final color coat to set for at least five minutes before adding a top coat ensures a stable base and prevents smearing under the sealant.
4. Drying Strategies
Dipping nails into a bowl of icy water for 10–15 seconds can firm up the polish surface and speed up drying without altering the finish.
Applying a quick-dry top coat helps seal the design and smooth any minor imperfections, while also accelerating the overall cure time.
Avoiding hot water or steam for at least one hour after painting prevents softening of polish that can lead to smudges.
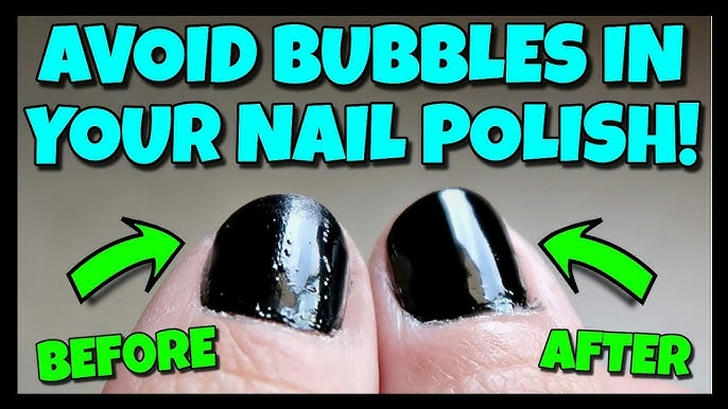
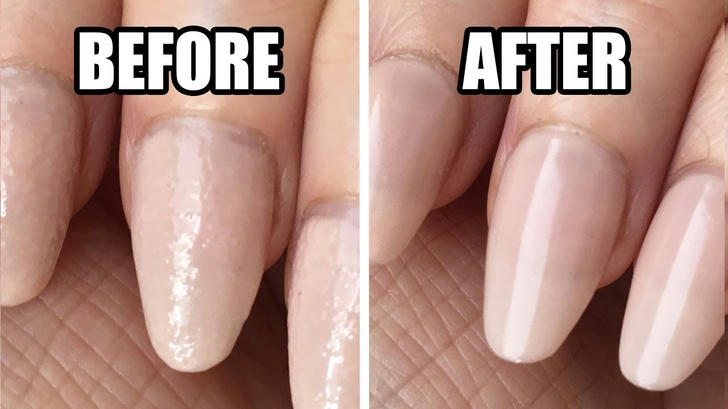
5. Troubleshooting Bubbles and Smudges
If small bubbles appear, pressing gently with the brush tip before the polish fully sets can dissipate trapped air and flatten the surface.
Lightly smoothing out smudges with a clean, dry nail-art brush or a fine-grit buffer before applying top coat can restore uniformity without redoing the manicure.
For deeper smudges, waiting until the polish is almost dry and then carefully hovering a cooling fan across the nails can set minor imperfections before they become permanent.
6. Maintenance and Aftercare
Reapplying a thin layer of top coat every two to three days protects against chips and maintains shine.
Using a non-acidic cuticle oil daily keeps surrounding skin hydrated, preventing dryness-induced cracks that can catch polish edges and lift the finish.
Wearing gloves during household chores limits exposure to detergents and water, preserving the integrity of the manicure and avoiding premature smudges.