
How to Clean and Sanitize Nail Tools
Regular cleaning and sanitizing of nail tools prevents transmission of bacteria, fungi, and viruses, ensuring safe manicures and pedicures at home or in a professional setting. The recommended protocol involves manual removal of debris, immersion in EPA-registered disinfectants or alcohol, thorough rinsing, complete drying, and proper storage to maintain tool integrity and efficacy. Following these steps after each use supports both nail health and overall well-being.

1. Why Sanitation Matters
Poorly maintained nail implements can harbor pathogens such as Staphylococcus aureus, Pseudomonas aeruginosa, and dermatophyte fungi, which may cause paronychia or systemic infections if introduced through skin breaks.
A survey of nail salons found harmful bacteria in over 80 percent of foot baths, highlighting the need for rigorous hygiene practices for all tools and equipment.
State and federal cosmetology regulations require that multi-use implements be disinfected or sterilized before serving each client to prevent cross-contamination.
2. Required Supplies and Equipment
- Stiff Brush: Nylon or stainless-steel brushes remove debris from grooves and hinges.
- Mild Detergent: pH-neutral antibacterial soap or salon-grade cleaner to break down oils and visible soil.
- EPA-Registered Disinfectant: Hospital-grade quaternary ammonium compounds or bleach alternatives, used at the label-specified contact time (typically 10 minutes).
- Isopropyl Alcohol (70%–90%): Suitable for porous tools (buffers, files) where immersion in disinfectant is impractical.
- Protective Gear: Gloves or tongs to avoid direct contact with contaminants and disinfectants.
- Clean Towels: Dedicated lint-free cloths or paper towels for drying and wrapping sanitized tools.
- Covered Storage: Labeled, ventilated containers or drawers to keep tools dry and uncontaminated between uses.
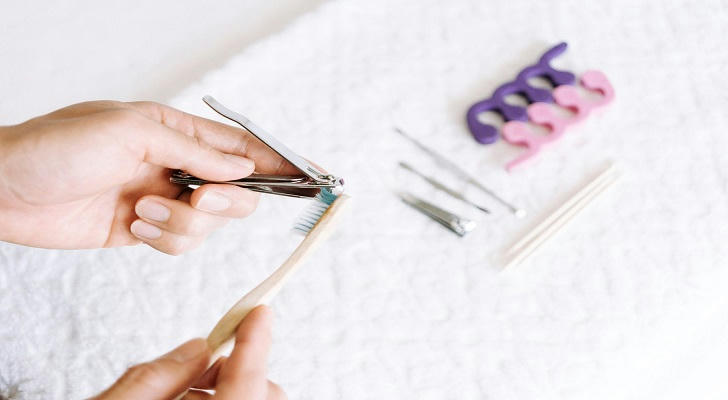
3. Step 1: Manual Cleaning
All implements must first undergo manual cleaning to remove visible soil and organic matter.
Metal tools (nippers, pushers, scissors) should be scrubbed under warm, soapy water using a stiff brush, paying attention to hinges, serrations, and crevices.
Electric-file bits require wire-brushing each groove to dislodge embedded particles before any chemical step.
Porous items—foam buffers, sanding bands—must be brushed under running water to clear lodged debris.
Following cleaning, all items should be rinsed thoroughly with potable water to remove detergent residues.
4. Step 2: Disinfection
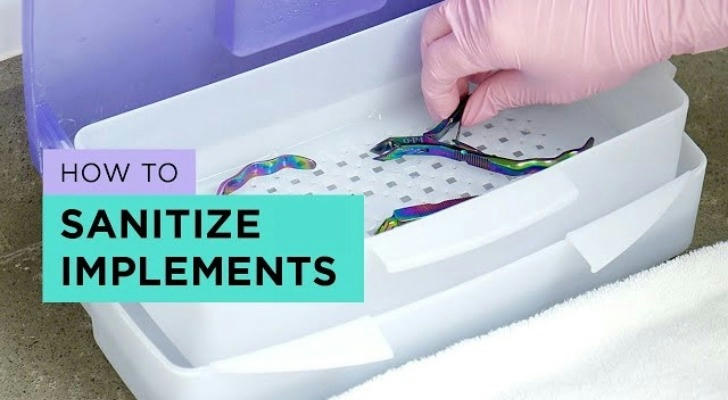
4.1 Full Immersion for Metal Implements
Metal implements must be fully immersed in an EPA-registered disinfectant for the manufacturer’s specified contact time (commonly 10 minutes).
Covered containers prevent evaporative loss and help maintain effective concentrations.
4.2 Alcohol Soak for Porous Tools
Foam buffers and sanding bands should be submerged in 70%–90% isopropyl alcohol for at least 5 minutes to achieve sufficient microbial reduction.
4.3 Spray or Wipe Method
For implements or surfaces that cannot be immersed, a hospital-grade disinfectant spray or wipe should maintain visible wetness for the full contact time listed on the label.
5. Step 3: Rinsing and Drying
Metal tools should be rinsed if required by the disinfectant label to prevent corrosive damage.
All items must then be air-dried completely or dried with a dedicated clean towel; moisture retention can promote microbial regrowth and rust.
Porous items soaked in alcohol can be shaken and left on a sanitized surface to air-dry fully.
6. Step 4: Proper Storage
Once dry, tools should be stored in a clean, covered, and labeled container or lined drawer, separated by type to avoid cross-contamination.
Single-use implements—wooden sticks, cotton balls, nail wipes—must be discarded after each use and replaced with new supplies.
7. Frequency and Record-Keeping
In professional environments, disinfectant solutions should be prepared fresh daily and replaced immediately if they become visibly soiled.
Tools require sanitizing before every service, with logs maintained to track solution changes and cleaning cycles.
At-home enthusiasts should adopt a similar routine of cleaning and disinfecting after each personal use to maintain safety and nail health.
8. Disinfection vs. Sterilization
Disinfection reduces most pathogenic microorganisms but may not eliminate bacterial spores; this is appropriate for tools contacting intact skin.
Sterilization destroys all microbial life and is required for implements that contact blood or broken skin (e.g., after nail-bed trauma).
9. Best Practices and Tips
- Wear disposable gloves when handling disinfectants and soiled tools to protect skin and maintain hygiene.
- Avoid cross-contamination by never mixing sanitized and soiled tools in the same container.
- Inspect tools regularly for wear or damage; cracked handles or chipped edges can harbor microbes and should be replaced.
- Maintain a dedicated personal-use kit to reduce salon-to-home pathogen transfer.
10. Conclusion
Adherence to a structured cleaning and sanitizing protocol—from manual cleaning through proper storage—ensures nail tools remain safe, effective, and long-lasting. This regimen minimizes infection risks and supports both nail health and client confidence in home or professional nail care routines.