
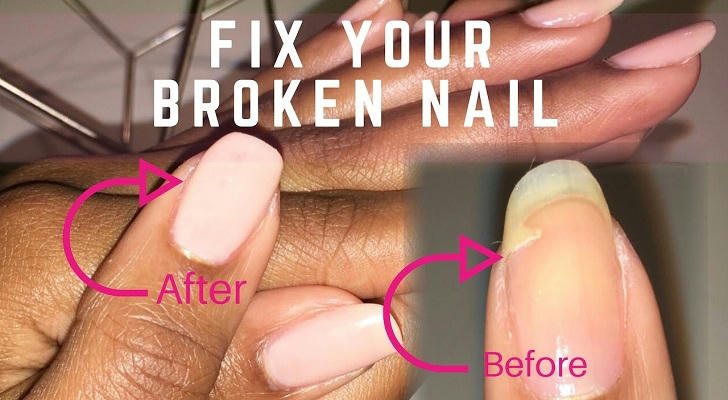
How to Fix a Broken Nail at Home
A broken nail can often be managed quickly and safely at home by first cleansing and assessing the injury, then choosing among several at-home repair methods—most notably the tea-bag patch, nail-glue reattachment, or simple trimming and bandaging. Post-repair care (filing, hydration, nutrition) supports healthy regrowth, while preventive practices (proper length, protective gloves, balanced diet) reduce recurrence. Severe breaks or signs of nail-bed trauma warrant professional consultation.
1. Assessing the Damage
1.1 Identify Severity
Readers should determine whether the break is minor (a small chip or snag) or severe (a deep split into the nail bed). Minor snags may be smoothed with a file, while deep splits risk bleeding or infection.
1.2 Clean and Prepare
Before any repair, the finger should be rinsed under warm running water and dried thoroughly with a clean towel to remove debris and oils. If any portion of the nail is hanging loose, it should be gently trimmed away with sanitized clippers to prevent further tearing.
2. DIY Repair Methods
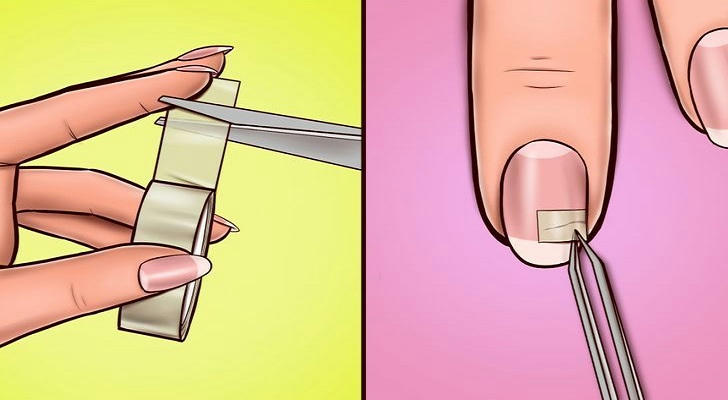
2.1 Tea-Bag Patch
- Cut a small piece of an unbleached tea bag (or coffee-filter material) slightly larger than the break.
- Apply a thin coat of clear nail glue to the broken area and, using tweezers, press the paper onto the nail, folding any excess under the tip.
- Once set (about 30–60 seconds), add a second layer of glue over the patch.
- After full drying, gently file to blend the patch into the nail surface.
2.2 Nail-Glue Reattachment
For breaks where the detached piece is intact and still attached by a flap:
- Warm the nail under gentle water flow to increase pliability.
- Squeeze a drop of nail glue directly onto the break line and press the detached fragment back into place for 30 seconds.
- Wipe away surplus glue with a cotton swab, then file smooth after curing.
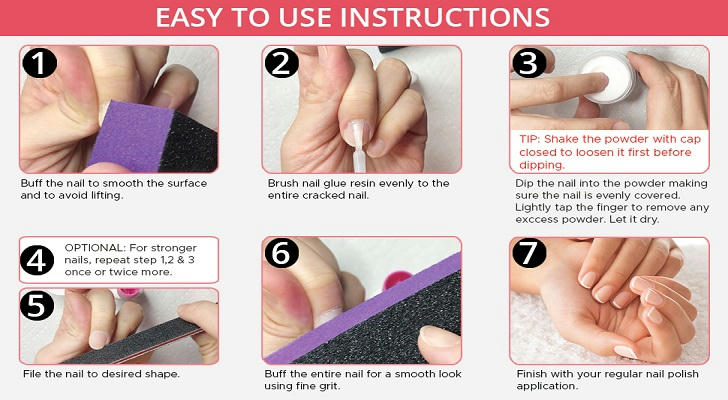
2.3 Alternative Patch Materials
Silk wraps or specialized nail-repair kits function similarly to the tea-bag method, using thin fabric bonded with resin. These kits often include pre-cut wraps and adhesive steps, enabling quick application and a stronger finish.
2.4 Protective Bandage
When repair materials are unavailable or for very painful breaks, covering the area with a small non-adhesive gauze pad secured by a light bandage provides cushioning and protection while the nail grows out.
3. Post-Repair Care
3.1 Filing and Shaping
After patching or gluing, filing in one direction with a fine buffer evens the surface and prevents future snags.
3.2 Hydration and Nutrition
Daily application of a cuticle oil or hand cream containing lanolin or alpha-hydroxy acids improves flexibility and reduces brittleness. Biotin supplementation (2.5 mg/day) has been shown to increase nail thickness and reduce splitting in controlled studies. A protein-rich diet with adequate zinc and iron supports rapid regrowth.
4. Prevention Tips
4.1 Maintain Manageable Length
Keeping nails trimmed to just beyond the fingertip reduces leverage that causes bending or catching on objects.
4.2 Protective Gloves
Wearing nitrile or cotton-lined gloves during dishwashing or cleaning limits exposure to water and harsh detergents that weaken keratin.
4.3 Avoid Using Nails as Tools
Refraining from opening packages or picking at adhesives with the nail edge prevents micro-traumas that accumulate into breaks.
4.4 Balanced Diet
Ensuring sufficient intake of vitamins A, C, D, and B7 (biotin), along with minerals like iron and calcium, maintains nail matrix health and resilience.
5. When to Seek Professional Help
If the injury involves heavy bleeding, intense pain, a nail detached more than halfway, black or purple discoloration under the nail, or loss of finger mobility, consultation with a dermatologist or primary-care provider is advised to rule out nail-bed laceration or infection.