
How to Prep Nails Before Applying Any Product
Proper nail preparation establishes a clean, smooth foundation that enhances product adhesion and prolongs wear. It begins with complete removal of previous polish and thorough cleansing to eliminate oils and debris, followed by precise shaping to achieve the desired form without weakening the nail edge. Cuticle care softens and repositions skin to reveal the full nail plate, while light buffing adds subtle texture for better grip. Dehydrating and balancing the nail’s pH removes lingering moisture, and applying a thin, even base coat seals the surface, prevents staining, and creates an optimal canvas for color or treatments.
1. Remove Old Products and Clean
Complete removal of any polish or residue is essential to prevent uneven application and peeling. Old polish should be dissolved and wiped away entirely with an acetone-based or non-acetone remover, ensuring no pigment remains. After polish removal, nails benefit from a second cleanse: wiping each nail with a lint-free pad soaked in isopropyl alcohol or a dedicated nail cleanser removes natural oils and microscopic dust that interferes with adhesion. Once cleansed, nails must air-dry for at least two minutes—any residual moisture trapped under polish can lead to lifting or bubbles.
2. Shape and File Precisely
Shaping nails establishes both aesthetics and strength. A fine-grit emery board (240 grit or higher) should be used to file nails in one direction only, from the outer edge toward the center; this technique minimizes splitting and maintains structural integrity. Whether choosing square, oval, almond, or coffin shape, gentle, gradual strokes help control symmetry and avoid over-thinning the nail. Back-and-forth “sawing” motions should be avoided, as they create micro-tears that weaken the nail and contribute to peeling.
3. Cuticle Care for a Clean Plate
Healthy cuticles protect the nail matrix and support polished edges. First, soften cuticles by applying a pH-balanced cuticle remover or oil and letting it penetrate for one to two minutes. Using a rounded-tip cuticle pusher, gently push the softened skin back toward the nail fold without force; this exposes the full nail plate for even product coverage. Any loose, dead skin around the edges can be trimmed with stainless-steel cuticle nippers—only remove tissue that is clearly non-living (white and papery) to prevent bleeding or infection.
4. Buffing for Optimal Adhesion
A light buffing step refines the nail surface by removing high points and gloss that can repel polish or gels. Using a fine-grit buffer (180–240 grit), lightly stroke each nail in one direction to create uniform micro-texture; the objective is to dull the natural shine without thinning the nail excessively. Buffing helps the product adhere more securely, reducing the likelihood of premature chipping or lifting.
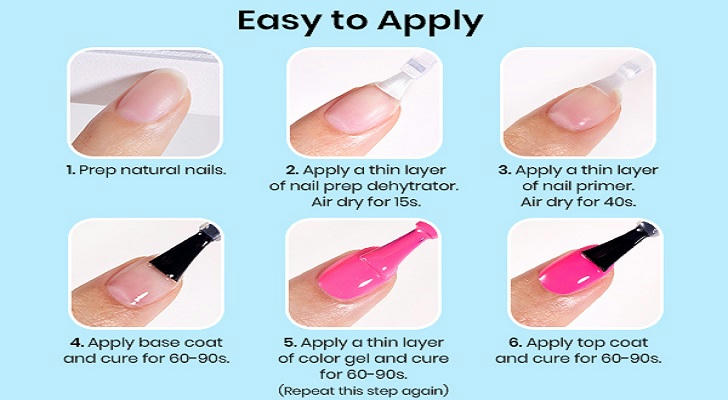
5. Dehydrate and Prime
Natural nails contain oils and moisture that weaken product hold. A nail dehydrator—often 100% acetone or an acid-free dehydrating solution—should be brushed onto the nail plate and allowed to evaporate, drawing out residual moisture. Following dehydration, a pH-balancing primer (sometimes called “bond”) neutralizes surface acidity and further promotes adhesion; primers should be applied sparingly in a thin layer and cured if required by the system. Skipping these steps is a common source of lifting, especially under polishes or gel systems.
6. Apply a Base Coat
A quality base coat serves three critical functions: it fills microscopic ridges for a smooth finish, creates a barrier to prevent colored pigments from staining the nail, and enhances product longevity by bonding the first layer to the nail surface. The base should be applied in a thin, even coat, avoiding pooling at the cuticle or edges, and allowed to dry or cure fully according to product instructions. Proper base application reduces chipping and provides a uniform foundation for any subsequent color or treatment.
7. Final Inspection and Readiness Check
Before proceeding to color or treatment, each nail should be inspected under bright light and a dusting brush passed over to dislodge lingering particles. The plate should appear matte with no visible shine (unless using a rubberized base that appears glossy), and no tacky residue should remain unless specified by the primer system. At this point, the nails are fully prepped, ensuring maximum adhesion, smoothness, and wear length for any product applied thereafter.